Tips for Tackling Large Scale Projects - Part 1
Don't be intimidated - it's worth the effort
Contents
Introduction
Like many people I began cross-stitching by purchasing pre-packaged kits with relatively simple, smaller designs with only a few colors. It can seem daunting to go from stitching small projects that were purchased as a kit to a large scale project that you have to kit up yourself.
I’ve seen many people comment on Facebook groups that there is no way they could ever tackle a large scale project such as a Heaven and Earth Designs as they would not know where to start. Here we will offer some suggestions to hopefully make your first large project more manageable and slightly less overwhelming…
Be Realistic
The first thing when starting a large project is to be realistic about how long it will take you. Expect for it to be years rather than months - make no mistake it is a big time commitment. Don’t put too much pressure on yourself, stitching at this scale is no different to smaller kits, it is still one stitch at a time but it will take a lot longer
It may seem like you are not making progress sometimes, especially if you are working on a highly detailed area full of confetti (BTW: don’t skimp on the confetti it is where the detail is and makes a huge difference) but every stitch helps and is working towards completion.
Take progress pictures - it will help you step back and look at the project as a whole rather than just the little area you are currently focusing on and it is easier to see progress and keep motivated - plus once you are finished you can create a cool time-lapse video of the project from start to finish. Checkout my work in progress of one of my current large projects here:
Work in Progress - Blue Dragon HAED
Don’t try too many new things at once it will overwhelm you and add stress, cross stitching should not be stressful. If you have only ever stitched on 14 count but decide to jump to 28 count this is going to be a huge transition, your eyes will scream. Add to that that you may want to start from the edge when you have always started from the middle. Some people may tell you must park your threads and always grid. Doing all these things for the first time all at once will likely be too much so pick what is most important to you and go with what you think you can manage. There are no “rules” in cross stitching so find what works for you and stick with it!
Most importantly do not listen to people if they make comments such as “haven’t you finished that yet” etc. People who do not stitch often have no idea how time consuming it is so don’t let comments like this get you down and demotivate you. It’s all about the journey rather than the finishes (although those are nice too)
If you have made a start on a large project but are finding some aspect of it impossible and stressful stop and figure out the problem - don’t push through and get half way only to give up completely figure out the issues early rather than getting to the sunk cost stage. If you are struggling with fabric choice for example this will usually become obvious to you very early on so don’t be afraid to stop and re-evaluate your supplies or setup.
Taking on a large project like this is a big endeavor and more work than doing smaller pieces. But it also produces a finished piece that has a dramatically greater “wow” effect when people see it. Of course there’s nothing to stop you having a large ongoing project and taking occasional breaks from it to work on smaller pieces that you can hang on your wall and satisfy your finishing fix.
(Edit - June 2022)
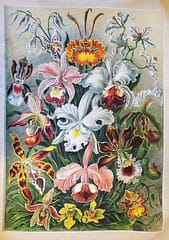
This is a Thread-Bare Chart called Orchidaceae (Orchids) based on the public domain artwork of Ernst Haeckel and was stitched on 14 count aida by Fiona King who kindly gave us permission to feature her work. It is an amazing finish that only took her just over 3 years to complete. This design is 327 stitches wide by 460 stitches height and contains 93 colors.
Kitting Up
So you have picked out and purchased your chart. The first thing to do is to gather your supplies.
Choose the Right Fabric Count for You
Some chart designers only give the dimensions and thread usage counts for a single option of fabric such as 25 count, but this absolutely does not mean you must use this count of fabric. The end product will not look any different whether you stitch it on 25 count or 14 count the detail will not change. The finished piece will just be bigger the lower the thread count you use. Also with the lower thread counts you will use more floss as the individual stitches end up larger.
One consideration though is that lower thread counts will require a much larger piece of fabric and so will be heavier to hold while stitching but with the right frame or hoop stand set-up you can overcome this. I think one of the most important things when tackling a large project is to use a fabric count that you are comfortable with and used to. You will be looking at and working on this for a long time so if your fabric choice is going to be a strain on your eyes the project is more likely to be abandoned in the long run so go with a thread count that you know you can work with.
Picture of the fabric for my supersize project that measures 999 x 666 stitches - 18 count aida 62” x 42” - Don’t let the size intimidate you! - Puppy for scale

Figuring Out How Much Fabric You Need
To calculate the size of fabric you need to complete your project you need to know the number of stitches across the width and height of the design and also decide what thread count you wish to work on. You then need to divide the number of stitches in the width by the thread count, this will tell you how many inches the width of actual design will be. IMPORTANT you then need to add 6 inches to this number so that you have 3 inches of blank fabric at the edges of your picture to allow for framing. Then you would calculate the height in the same way.
For example if my design had a width of 450 stitches and height of 648 stitches and I was planning to use 18 count fabric my calculation would be as follows:
- Width 450 stitches / 18 count = 25 inches + 6 inches = 31 inches
- Height 648 stitches / 18 count = 36 inches + 6 inches = 42 inches
So I would purchase 18 count fabric measuring at least 31 x 42 inches, this would allow me to complete my design with 3 inches of blank fabric all around the edges for framing.
Measure and re-measure, be absolutely sure you have the dimensions correct before you start.
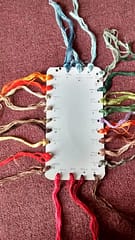
Calculating Your Floss Requirements
As some designers only give the floss requirements for a particular thread count you may need to recalculate how much you need. The lower the thread count the more floss you will use. To decide how many strands to use for your particular thread count check out our article on coverage here:
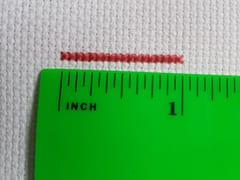
Examples of Coverage Across Different Thread Counts
Floss usage depends on how many strands you decide to use and also your stitching technique, for example parking threads tends to use more floss. Another factor is how much wastage you end up with due to your technique and if you make any mistakes
As a general rule using 2 strands of floss to stitch here is a rough guideline (very unscientific and is just a guide!)
- 14 count 1600 stitches per skein
- 16 count 1800 stitches per skein
- 18 count 2000 stitches per skein
- 20 count 2200 stitches per skein
- 22 count 2400 stitches per skein
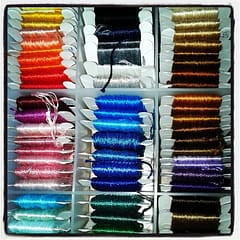
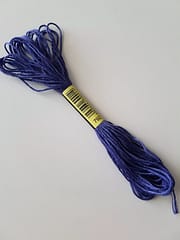
When kitting up your own project try to buy all the floss of a particular color at the same time where possible, the reason for this is during production, thread is colored in dye lots which occasionally can lead to slight color variances between lots. This will not really matter for small detailed areas but if part of your design has large blocks of the same colour it could be noticeable.
Hopefully you find this article useful and it will maybe encourage you to take the plunge with your first large project. In part 2 we will look at preparing your fabric, getting organised and figuring out where to start.
Link to part 2:
Tips for Tackling Large Scale Projects - Part 2
Follow our us on our Thread-Bare Stitching Facebook Page or Thread-Bare Stitching Pinterest Channel for news and future articles