The Thread Parking Method of Cross-Stitching
How to keep a tidy back to your piece
Contents
Introduction
So after hanging around cross-stitching groups for a while I have decided “parking” is like marmite or vegemite - you either love it or you hate it! Personally I do not park my threads but I can definitely see the benefit of it, especially on a large-scale, full-coverage project.
So what is thread parking and is it for you? We will look at some of the benefits and methods for parking and you can decide whether you want to try it or not.
Parking is basically where you are working in 10 x 10 or 20 x 20 blocks and you fully complete a section (block) of the chart before moving on, but rather than completely end and tie off your thread you “park” them in the next section that they appear in ready to continue with that particular color.
The main rule with parking is consistency and ideally you will already be forming your stitches in the same way each time but it’s especially important when parking - you will always park at the same starting point of the next stitch. So you need to be consistent in the way you form your stitches and also where you park a thread, otherwise it could get very confusing, especially when working on lots of similar colors. It would be easy to end up one stitch-count out if you did the parked stitch in the wrong direction
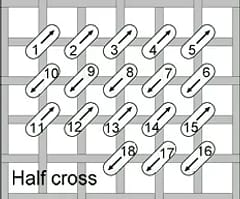
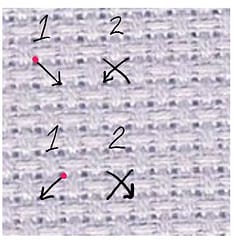
For example, I form my stitches \ (top left to bottom right), followed by / (top right to bottom left). So if I were to park a thread I would leave it in the top left, coming through the material from back to front, which is the starting point of the next stitch with that color.
Example of ways to form a stitch - starting point marked with pink circle.
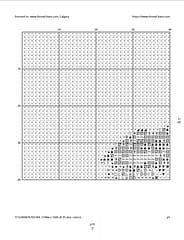
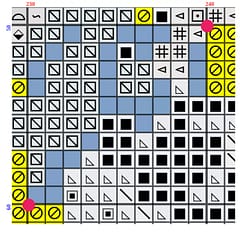
On the picture below all the blue stitches with the highlighted symbol have been completed within the 10 x 10 square, so I would park my thread in either of the areas marked with the pink blob (depending on whether I was working horizontally across or vertically down the chart) as this is the next point that that symbol appears in the next section and it is also the starting point of my cross.
Some people also find it useful to mark their chart with the position of the parked thread.
So what are the benefits and drawbacks to parking?
Pros
- Fewer “ninja” stitches (where you have to go back for a lone stitch that was missed
- Easier to keep track of where you are on a chart
- Neater back as less starting and stopping and tying off threads
- Less likely to make mistakes, especially on confetti heavy areas as you stick to the 10x10 blocks
Cons
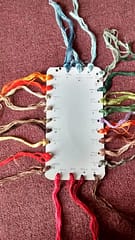
- Lots of re-threading of needles or hanging needles if you leave them threaded (this is where a needle-minder would come in useful)
- Potential grid or column lines forming in your stitching if tension too tight on your frame or when you form your stitches
- Loose hanging threads can get tangled (some people use hair clips to avoid this)
A very well done video that demonstrates parking has been provided on youtube by Carolyn Mazzeo:
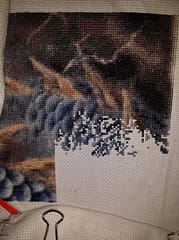
There are many ways to park and if you’re going to use it you need to find the best way that works for you. Some people stick to working in the 10 x 10 blocks, others work line by line across the page. Also a lot of people use a combination of parking and cross county stitching - in that they park some threads but do not necessary stick to working in a fixed set 10 x 10 grid. Here is an example of a work in progress picture which demonstrates this.

Hopefully this has been useful in explaining the basics of the parking method, whether you end up loving or hating parking it’s worth giving it a try to find out!
Be sure to like and follow us on our Thread-Bare Stitching Facebook Page or Thread-Bare Stitching Pinterest Channel for news and announcements.