Computer Image File Formats for Cross-Stitchers
which file format is the right one to use
Contents
- Introduction
- Bitmaps and RGB
- RGBA
- Why Compression is Needed
- GIF
- PNG and JPEG
- Lossy vs Lossless
- RAW and WEBP
- Tell Me Which to Use!
- PSD (Photoshop)
- What Formats We Use
Introduction
Whether it’s choosing which format to use when importing photos from your camera, downloading images from the internet or saving a picture from and editing program, you may be given the choice between what can easily seem like a bewildering list of options.
BMP, GIF, PNG, JPG, WEBP, PDF, PSD, RAW, TIFF & more - why so many? Don’t they all do the same thing and just let us save a picture? Well, they all have their strengths and weaknesses and some are more or less suitable to use than others in different situations.
Bitmaps and RGB
As we mentioned in a previous post about anti-aliasing images the image you see on your screen is a “raster” image which is basically a grid of pixels. Each pixel is a different color and the colors you see are typically defined in terms of an RGB value - the mix of Red, Green and Blue light to emit to create the exact color. Each RGB component value is a single “byte” which is 8 binary bits and can have a value from 0 to 255. The three sets of 8 bits is why you might see an image referred to as “24 bit-color” and although a 0-255 range doesn’t sound much, it adds up to 16,581,375 (16.5+ million) different colors.
When it’s displayed, it’s often referred to as a “bitmap” because each pixel is mapped to the bits in memory that define the colors. Although we may see a square that’s 640x480 pixels, to the computer it’s just one long list of 307,200 pixels and each pixel is 24 bits … so that would be 921,600 bytes - nearly 1Mb of memory. The computer needs to know the dimensions of the image in order to display it correctly - a 320x960 image would be the exact same size and layout of data.
If you’re thinking that 1Mb seems like a lot of memory to store a rather small 640x480 image then you’d be right - which is precisely why images are rarely stored or transmitted as raw bitmap format. The older BMP format did just that which is why you rarely see it used much nowadays.
Incidentally, this is what’s referred to in adverts for cameras. When you see “24 magapixel” it means the size of the bitmap image in memory, not that the photos are going to be 20Mb when saved.
RGBA
You may come across references to RGBA … the A stands for Alpha and means that the image supports transparency which itself can be at different levels. These would be stored as 32 bits in memory when representing the image and also needs to be stored just like one of the other color components so transparency doesn’t come for free.
Why Compression is Needed
Even BMP had some tricks it could do to try and reduce the size it took up somewhat. The simplest was to replace identical pixels with a code that said how many times to repeat it. So, if you had a particular shade of red and it was in a block, the file could avoid repeating the RGB pixel byte values. This was a very basic form of compression that worked for simple images such as logos but rarely helped with photos that tend not to have such large blocks of identially colored pixels.
And this is really where image formats started - storage used to be very expensive and lower capacity than we enjoy today (I remember having a 10Mb hard drive and thinking I could never fill such a monster). Transmission speeds were also much slower than today with early modems only sending hundreds of bytes per second (imagine that 640x480 image taking an hour to download!).
Over the years different formats have been created to compress images and make them cheaper to store and faster to send. So, they must have gotten better and now there is a single correct format to use, right? Sorry, if only life were that simple …
GIF
An early format that compressed images was GIF (short for Graphics Interchange Format) which is surprisingly still ubiquitous on the internet. It’s ability to display animation without needing any video player makes it a favourite for memes and ironic as the feature that the animation uses wasn’t intended for that and the spec actually specifically suggests that it should not be used for animation. Oh well.
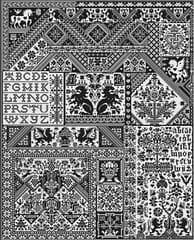
But although GIF provided better compression than BMP, it still wasn’t brilliant which is why animated GIF files are often pretty huge. One of the reasons it was smaller is that it uses a technique called “indexed color”. Instead of storing the RGB values for each pixel, it stored a palette of colors and then each pixel stored the index of that palette. So a single pixel was stores as a single byte (8 bits) which is why it was called “8 bit color” and meant that the entire image was limited to a maximum of just 255 different colors - OK for icons and logos but nowhere near the 16.5 million that we need for photos. There was also another problem which was licensing - the company that owned a patent on the format didn’t disclose it until it was widely used and then tried to “sting” everyone who’d used it for license fees. Ouch!
PNG and JPEG
So the world went in search of better formats and around the same time ended up with both PNG (pronounced “Ping” but short for “Portable Network Graphics”) and JPEG (named after the rather self-aggrandizing people that created it - the Joint Photographic Experts Group).
JPEG or JPG (the shorter version often used because Windows only allowed 3 character file extensions) was focused on photographs and could achieve great compression rates of 10:1. It included support for EXIF data which is extra information embedded into the file besides the image itself and used to store copyright information plus all the camera settings used to take the photo including the make and model of camera, the lens type and even which way up it was held. PNG on the other hand focused on just the image pixel itself and the other feature that GIF had which was support for transparency (the misuse of the GIF format for animation probably came later and there were attempts to create an APNG variation that supported it).
PNG actually had two different ways to store images - either as 8 bit indexed color like GIF or as 24 bit color so it could be used for both icons and logos (saving space if fewer colors were needed) and for true color images like photos. But a photo compressed with PNG will rarely be as small as the JPEG equivalent.
Lossy vs Lossless
Does this mean you should always use JPEG for photos? Well, there is one other very important difference between the two - PNG is a “lossless” format, which means that after saving an image, transmitting it and loading it again, the pixels will be exactly the same as the original. But JPEG is a “lossy” format which means that saving it loses some information - the photo you load is not exactly the photo you saved!
Part of how JPEG achieves it’s compression by is deciding which part of the image information can be discarded based on an understanding of how human vision operates. You can also select the amount of compression you want to use - a JPEG saved at 50% quality will be much smaller than one saved at 90% quality. But file sizes start to go up dramatically as you get past 80% for little gain in quality (even 100% will lose some detail).
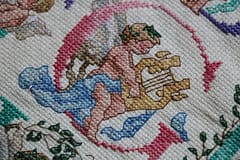
The high compression ratios / lower quality settings of JPEG have a tendency to create visible artifacts on image. For many photos they may not be visible but they are particularly noticeable for text, icon and line-art images (which is why JPEG is often the wrong option for those) and if there are hard contrast areas of an image - a person against a light sky for instance.
But even when slight, these distortions are cumulative and apply and amplify each time you save a file. If you repeatedly load, edit and save a photo then it will degrade each time which is why you should try to use non-destructive edits applied to the original image, not an iterative process.
If you see a compression option for PNG don’t imagine that it affects the quality of the image like it does for JPEG, it’s always lossless and the compression setting is purely todo with how much CPU time you want to spend on the compression (yes, another holdover from the time before todays super-powerful processors were common).
You might now wonder why your camera spits out JPEG files instead of PNG files - surely you’d want the image to be as perfect as possible? Well, JPEG gained traction because it was designed for photographs, could store all the extra camera data and was built directly into processors used in cameras where it could run very quickly (saving limited battery power) and it’s better-compression ratio meant you could store more photos on often limited capacity memory card (long before the time you could get a tiny SD card with todays 400Gb capacity).
RAW and WEBP
But if you have a higher end camera you may have the option to save and load photos in an uncompressed format, often known as RAW but really only something that serious or professional photographers would be interested in using.
JPEG is a 20+ year old design though and although it’s widely supported (which makes it hard to unseat) there have been efforts to create new formats that deliver either better compression or produce higher quality (ideally both if possibly). JPEG themselves produced JPEG 2000, Microsoft created JPEG XR and Google has created WEBP which is more widely used on the web (it’s built in to Chrome and some other browsers and used by some websites including Facebook to speed-up image load times and reduce their bandwidth costs). There are some others but if companies such as Microsoft and Google struggle to make their formats a defacto standard like JPEG you can imagine it’s an uphill struggle, even if someone does produce a format with significant technical benefits.
Tell Me Which to Use!
So, which do you use when cross stitching?
If you have an option to download an image from a store and you care about quality you should usually pick the PNG option over JPEG unless you are limited for bandwidth or storage space - it will typically be larger but will be exactly the image intended. JPEG is usually a good option for faster downloads as long as it’s not line-art, lettering or contains hard-edges - look out for the tell-tale JPEG artefacts that will tell you if the image has been over compressed. Don’t worry about downloading photos off your camera as JPEG as long as you always store the original and don’t repeatedly edit and save the same file.
You can’t really go off the size of the file as a measure of quality. You could have two different but same-sized JPEG images saved with the exact same compression options and one might be 500Mb and the other 3.5Mb - it really depends on the nature of the image contents as to which is more compressible.
What you use to display an image within a pattern depends on your viewpoint. We think any image shown on a chart should represent the image that chart is going to reproduce so for ours, we include a pixel-perfect PNG version of the pattern so you can see exactly what it should look like when stitched. We’ve seen patterns that include a JPEG image of the original image (photo or artwork) which will obviously “look” much better when you view it but isn’t really what the pattern will reproduce when completed..
PSD (Photoshop)
If you import images into Photoshop then it’s best to use it’s own PSD format to save them and work off that until you decide you’ve finished and can then export it to either PNG if you want as-is, lossless, or to JPEG with around 80% - 90% quality (85% often comes out as a sweet-spot in terms of size vs quality).
You might think of PDF as an image format and while it can contain images, it doesn’t dictate what format those are and it’s really a document format (it actually stands for Portable Document Format). It’s worth knowing that you can have a PDF that is itself just an image - what you will get if you scan a page in, like a photo of a page of text, without running any Optical Character Recognition (OCR) on it. This will be much larger than if the text was stored as actual text - a character A takes a single byte to store and can be reproduced at the highest possible quality whereas a picture of a character A will take many pixels to get close. PDF files support their own compression format for text.
What Formats We Use
What about our photo to cross-stitch pattern conversion app? We support any format that your browser supports for loading images which means BMP, GIF, PNG, JPEG should all work as well as WEBP if you have Chrome. When you create a pattern we use PNG to store it to make sure that every pixel is stored exactly as you wanted it at the precise color that you previewed it. We use the 8-bit indexed color format to make it as small as possible which is partly why we limit the number of thread colors to 255 (and also because it rarely makes practical sense to even use anywhere close to that to stitch with). The source images for the patterns that you see in our store are saved as WebP format so we can save many very high-resolution images in an extremely cost efficient way to keep prices down and will be able to offer artists and designers their own stores without worrying about storage costs.
If you use our online viewer / stitch tracker we display the pattern with the completed stitches as a separate layer on top - the uncompleted stitches are transparent and allow the pattern symbols to show through. Marking a stitch as completed just sets the pixel of the top progress layer to match that of the pattern image and shows as the solid thread color. We save a snapshot of the currently completed pattern and use it to create frames in an animated GIF (which supports the same number of colors as our PNG file as well as transparency) and this then provides the animated display of your progress over time.
So that’s it - so many image formats, all created for good reason and all with their own unique strengths and weaknesses.
As always, please like our videos and follow our us on our Thread-Bare Stitching Facebook Page or Thread-Bare Stitching Pinterest Channel for news and future articles.