Photography for Cross-Stitchers
How to start with the right image
Contents
- Introduction
- Image Quality Matters
- Lossy Image Compression
- Basics of Photography
- Composition
- Sharpness
- Contrast
- Saturation
Introduction
Many cross-stitchers start out with simple kits and eventually move on to full-coverage pieces but at some point decide that they would like their own totally unique and personal pattern by converting their own photograph into a cross-stitch chart.
Whether it’s a photo that captured a special moment in time, a picture of a loved one or a memento of a special pet, a custom chart created from your own image will be totally unique and bring back the treasured memories captured by it.
It’s very easy though to focus too much on the subject of such an image and not enough on the image itself but starting with a good picture is vital to getting a finished piece that you will treasure whether you are charting the image using software you have bought, using an online service to do the pattern conversion or paying someone to do it for you.
We’ll try and show you some basic ways to improve your images so that the patterns you generate from them will produce better results.
Image Quality Matters
The first thing to realize is that the process of converting an image into a cross-stitch pattern involves making it worse, whatever software or service you’re using. This happens because we’re reducing the size and number of colors in the image to make it stitchable although there are some tricks that software can help with to keep images looking good the pattern will never be as high resolution or have as many colors as the one you started with.
Because of this, it’s important to start off with a high quality image and that means you have to be objective and look at the technical aspects of the image itself, not just the subject. Of course if your image is a one-off of an unrepeatable moment, that is all you can use, but if you have several images it’s important to pick the right one and in the age of digital photography, consider taking your time to capture a better image if you can.
Sometimes you can correct for deficiencies in an image using image editing software but it requires extra software and some skill and experience of how to use them so if you can get a better photo in the first place, it will make life simpler.
Lossy Image Compression
Before we get to making the images look better, let’s look at image formats because they can have a big impact on quality and we often see otherwise good images that have been seriously impacted by being mis-handled.
There are many different image formats but the most common ones people are familiar with are .gif, .png, and .jpg (or .jpeg on some systems). Most photographs are usually in the JPEG format as it’s the default for most digital cameras and phones. The reason for this is that it provides good image compression so that images take up less space and you can squeeze more photos into a limited storage space (e.g. on your phone).
What you may not be aware of is that it does this by throwing some of the image information away. This is known as lossy compression but isn’t as bad as it sounds - the format was specifically developed to identify which parts you won’t notice based on how our eyes work. Exactly how much information is discarded depends on the image compression quality settings - too aggressive with the compression can make it noticeable, a setting of 85% is usually about the best.
However, there is an important thing to remember - it doesn’t do this just once with the original image, it does it with the image every time it is saved or re-saved. This means that if you open and save an image without even making any changes to it, you are lowering the quality and even if you have a high quality set, the slight corruptions introduced will amplify and you will start to see what is known as “jpeg compression artefacts”.
While it can be not too noticeable in the photo, the process of converting it into a cross-stitch pattern can amplify these distortions resulting in them being much more noticeable. There are two ways to avoid this:
-
Don’t re-save jpegs. Load the original image and when you make any adjustments to it, save it as another copy, keep the original as it was when it came off the camera. If you want to do any more operations on it start again with the original image. If you are using more professional image editing software you may be able to save your adjustments as layers that can be applied to the image rather than changing the original itself.
-
Save using a lossless format. Instead of saving as .jpg, save it as a .png file which uses lossless compression. The file will be larger but every pixel will be 100% as it was each time you open and save it with no corruption creeping in.
Incidentally, this is also the reason that if you’re downloading an image and are given the option of .jpg or .png, the latter can be a better option. Some of the JPEG compression artefacts may not be visible to the human eye but they can be amplified by the chart creation software and appear as blocky colors in the result.
Finally, when you are sending an image to someone or uploading it to a service to be converted, send the file itself. We sometimes see people load up an image on their phone and then take a screenshot of it to share or send. That is again going to dramatically lower the quality and add multiple levels of compression to the image. Instead of the high quality 6,000 x 4,000 original image (for example) you’ll be capturing just what was on the screen which will be a much lower resolution.
Many sharing sites also compress images to save on their own storage and bandwidth costs. If you send an image with facebook for instance, it will be compressed again - so consider sending it as an email attachment instead.
Now let’s talk about the images themselves.
Basics of Photography
We’ll keep this brief but it’s useful to know the basics of how a picture is taken.
The camera needs to let a certain amount of light from the scene in for the sensor to detect and save it as an image. In old cameras, that sensor would be the actual film that was sensitive to light and needed chemicals to fix it’s sensitivity and develop into a picture but in digital cameras it’s now an electronic sensor.
The light comes through a lens to focus it and a shutter opens and closes to control how much light can come in based on how wide it opens and how long it opens for. Think of it like opening a tap - you can open it to only let a little water through at once and let it run for longer to fill the bucket or open it wider to fill it more quickly but you want the bucket to have a certain amount of water in it to be useful. The size of the bucket will also impact how quickly it fills - a smaller bucket will fill more quickly than a larger one all other things being equal.
Our bucket (the sensor) wants light instead of water though and just the right amount. Too little and everything is dark and to make things visible will make the picture look grainy. Too much and everything is over-exposed and too white. How wide the shutter opens is called the aperture and how fast it opens and shuts is called the shutter-speed. How much light is needed to ‘fill the bucket’ depends on the size of it or in our case the speed of the film which is normally given as an ISO rating - larger numbers are like having a smaller, faster-to-fill bucket for the light (because it reacts to the light quicker, it’s ‘faster’ film speed).
To get a sharp picture everything in the scene needs to be still. Anything that moves while the picture is being taken will appear blurred or at least less sharp than it should be. That is sometimes what you want for artistic effect but most of the time we want a sharp image of the subject.
If the shutter is open for longer, there’s more chance that things will move whether that is us moving as we take the picture or the subject moving. So, more light means the shutter doesn’t have to open as long which is why good lighting makes it easier to take a good picture.
The lens and the aperture also affect the focus of the scene. A wider aperture will mean less of the scene is in focus, what’s known as a narrower “depth of field” and makes for great portraits where the subject is sharp and the background is blurred so as to be less distracting. A smaller aperture will mean the focus could stretch almost to infinity and is great for landscapes.
That’s really the fundamentals of photography. Most cameras take pretty great shots and try to automatically set the right combination of aperture, shutter speed and film speed for you to take the best shot based on what it thinks the picture is of. When you set the camera to sports or action mode or to portrait or landscape mode you’re giving it extra hints of what settings it should favour based on what you know the picture is going to contain. You can also decide that you want to set certain settings to achieve a particular effect whether it’s setting the aperture to take a portrait and having the camera adjust the shutter speed automatically (aperture priority) or setting the shutter speed to capture something moving fast and have the aperture set for you (shutter priority) or setting everything yourself (full manual).
Composition
All these automatic features should really allow us to focus on the composition of the subject and there are a few things to consider here.
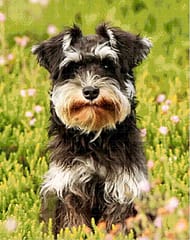
The first is to not be afraid to get in close. You want your piece to be of the thing you are interested, not a lot of background. If you’re taking a picture of your dog for instance, you don’t want it lost in a sea of green grass that will be boring and time-consuming to stitch, leaving the dog itself with little detail. So zoom in or crop the image down before you convert it.
The background may makes sense for the image composition when it’s a photo but if it’s converted into a pattern, it can result in a lot of background to stitch and unless the pattern is made quite large it can still lack detail in the main subject (the dog). Here is an example of a great photo converted at 500 x 333 - you can estimate how long a piece will take to stitch:
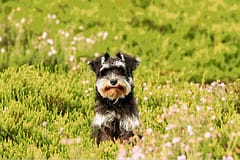
It looks good but would be a lot of work to stitch as it’s 166,500 stitches. Instead, cropping into the subject lets us have a pattern that is less work but has much more detail in the subject. This is 229 x 290, or 66,410 stitches - nearly 1/3rd of the effort, and yet the dog contains more detail:
Don’t forget that when you’re taking pictures of kids or pets we’re usually much taller than them so it’s easy to have pictures looking down on them where they are looking up and their legs disappear. To avoid this, get down to their level - sit on the floor or hold the camera low. Don’t be afraid to take your time so they get comfy with you to ignore the camera and you can capture a good shot while they are moving about as kids and pets tend to.
It’s tempting to line people up facing the camera and tell them all to smile but that can create awkward and artificial images. Consider trying to get more candid shots instead - images of people more relaxed, not noting the camera or when kids are focused and intent on some activity really capture people’s essence more and can make for more pleasing shots. Of course for some situations, like weddings, more staged and organized photos are expected.
A simple trick when composing a shot to make it look pleasing is to use the ‘rule of 3rds’. Instead of having the subject dead centre in the middle of the frame, position the shot so they are a 3rd of the way to the side and the result can look more interesting.
Sharpness
It’s very easy to take blurred images, even with modern cameras and smartphones. As well as the subject or camera moving while the picture is being taken we may also rely on the camera focusing and it may struggle because of the lighting or may have focused on the wrong thing and we haven’t noticed (many detect faces and try to focus on those).
It can be especially challenging when taking picture of children and pets as they never seem to sit still, especially if we do get down to their level. What can make the difference is patience. Let them get the excitement out of the way and just keep taking pictures until they forget you are doing it - very often it’s those pictures that are the real keepers.
Even with a decent shutter speed, using a tripod or monopod can make a photo noticeably sharper. Without these you can try keeping your arms and elbows closer to your body to steady the camera rather than holding it at arms length or hold your hand against some solid object (a chair or post) to give it more stability as you press the shutter.
Little things can make the images sharper and this will have an impact on the quality of any pattern that can be produced from it.
Contrast
Although we want the scene to be well-lit we don’t want the lighting to be too bright or harsh as this can result in half the picture being dark shadows and the other being much too bright. Mid-day sun is not the best time to take photos, earlier morning or later afternoon usually has nicer, softer light and also saves people squinting.
Tip: Don’t have people looking into the sun - as well as squinting you may have your own shadow in the picture. Sometimes having the sun behind them can give a nice lighting effect to hair etc… but you need to adjust the exposure to focus on their face.
Saturation
Saturation is harder to control and sometimes better adjusted later with software but having film speed too high can mean the brightness is captured more than the color. A slower speed can get richer colors in the image but you need to use a tripod or other method of steadying things to get it if the light isn’t bright enough. If you take a picture that is a silhouette (bright light behind the subject) you may completely lose the detail and color in the subject and it can’t be adjusted or recovered later.
Our image to pattern conversion tool includes options to enhance contrast, sharpness, saturation and other features that can help adjust images but the more you can improve your original photos, the better the results you’ll get.
But even if you don’t end up stitching many (or any) of your photos, learning how to improve your photography can be extremely rewarding and you’ll end up with more interesting photos to keep and share. Photography is an interesting hobby and you don’t need to invest in any fancy equipment - most phones are now more-than-capable cameras, so lookout for local groups that can help you learn more with some hand-on tuition.
Be sure to like and follow us on our Thread-Bare Stitching Facebook Page or Thread-Bare Stitching Pinterest Channel for news and announcements.